PHP
A comprehensive guide: How to install Zend Famework
The frameworks help programmer to build an application rapidly and efficiently while decreasing the security issues. Today I am going to install and configure Zend Framework which is one of the most powerful PHP framework that is being used around the globe. Magento, the most famous e-commerce CMS, is also build with the Zend Framework. Learning Zend Framework will help you understand Magento also and you will be able to code for Magento as well.
First of all you can download the latest version of Zend Framework from the link framework.zend.com/download/latest. You can also download the documentation here that will help you with development.
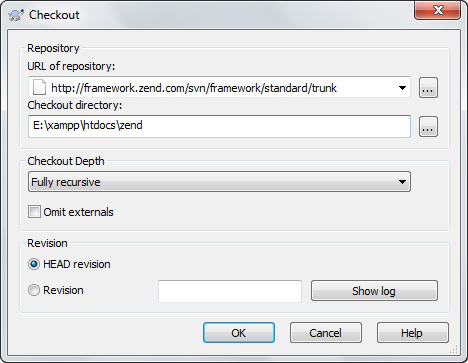
The advance developers can also get the latest release from SVN. To get the latest release using SVN download the Tortoise SVN from here and checkout form the link: http://framework.zend.com/svn/framework/standard/trunk

For Newbie to SVN: Install the Tortoise SVN create a new folder, right click on it and select SVN Checkout enter the above URL in URL of repository field and click OK.
Once you have downloaded the Zend Framework make sure you application be able to access frameworks classes. To accomplish this there are many ways to accomplish this. Your PHP include_path needs to contain the path to Zend Framework’s library. You can find the PHP include_path in php.ini file just change the following lines as bellow:
; Windows: “\path1;\path2″
include_path = “.;E:\xampp\php\pear\;E:\xampp\frameworks\”
Note: I added a folder “frameworks” and put the zend library in this files.
Important Configurations:
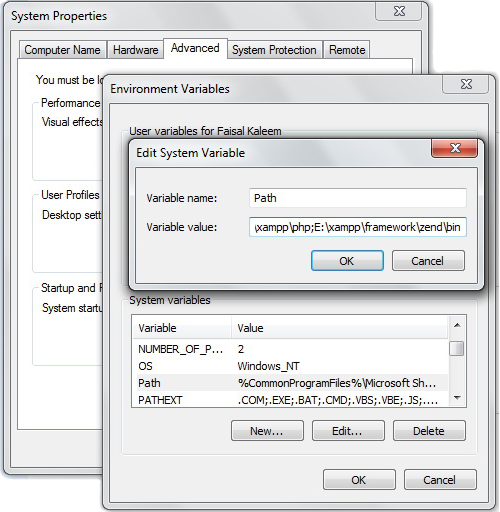
You need to set two environment variables one for php.exe that is located in PHP folder and the second one for the zf.bat (For windows). To do this go to the Computer Properties and add these two paths. In my case I have added two following path. See screen shot.
- E:\xampp\php
- E:\xampp\frameworks\zend\bin

Note: Adding the path info in environment variables will enable you to run Zend commands form the Command Line.
Build your first application:
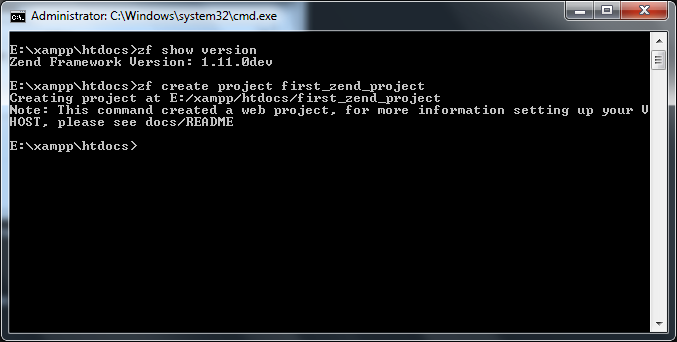
After successfully adding the the path info in PATH environment variable you can test by executing the following command in DOS
zf show version
If the following command shows you the Zend version then you have done all successfully. You can get help of of the command line tool by executing zf --help. This will show you all the possible command and parameters.
Now in DOS navigate to the directory where you want to create your new project and execute the following command:
zf create project first_zend_project
The above command will create and directory “first_zend_project” and will create all the necessary files and you can now start coding.

In the next post i will tell you how to configure your project and what tools there are that could help you in programming and make your life easy. So keep visiting my blog ![]()
A trick to insert update multiple records quickly and efficiently
In everyday programming we insert records and update them. Many developers use the INSERT query to insert data then use the UPDATE query to update data but before they actually need to get the WHERE condition to update the appropriate data. This task some times takes a lot of efforts if someone needs to insert multiple records simultaneously and it is more difficult to update those records simultaneously based on different condition for each record using the these traditional UPDATE and INSERT queries. Consider the bulk insert and update manipulation much similar to a data showed in a grid. Consider a simple example:
An admin has an interface to create new and update existing users/subscribers simultaneously. This interface has input boxes placed like a grid. He enters new record by inserting new row and make amendments to the existing users record. Think! how the system will recognize which records are new so that it could be inserted or updated in case existing users. The beginner level programmer probably say that we first will sort out all the submitted records in two categories new and old ones by making loop operation and sort the IDs in array and will perform the appropriate operation. Although this approach will work but results in a lot of messy code. Are you agree with me?
Now I am going to show my approach:
Consider the following query:
INSERT INTO users (id,email,first_name,last_name, dob) VALUES (1,'usman@abc.com','Usman','Khan','1989/10/30'), (2,'jamal@abc.com','Jamal','Nasir','1985/11/06') ON DUPLICATE KEY UPDATE first_name=VALUES(first_name), last_name=VALUES(last_name), dob=VALUES(dob);
The above query inserting the two records first time. As the id is primary key and email will surely unique so if we again run this query it will update all two records because of ON DUPLICATE KEY UPDATE triggers and updates the fields first_name, last_name and dob.
So you don’t need to check for the existing records using SELECT anymore. ![]()
Thank you guys for reading my post please feel free to put comments or critics. It will be highly appreciated.
How to save google map image to server
Once I was assigned a task to make a functionality that saves the google map images to the server. I searched on the internet but was unable to find any existing solution. But then an idea comes to my evil genius mind and I implemented it. Now I am sharing the logic with you all. Here is the code:
<?php
  $gmap = new SplFileObject('google_map.png','w');
  $image = file_get_contents("http://maps.google.com/maps/api/staticmap?center=Berkeley,CA&zoom=14&size=400x400&sensor=false");
  $gmap->fwrite($image);
?>
How It works:
The Google static map API provides a way to get the image by providing the parameters through query strings and google process these parameters and returns an image in png format by default. I called a PHP function file_get_contents to retrieve the image data in variable and wrote it in new image file named “google_map.png”.
That is so simple ![]()
Note: Google allows its maps for the web browsers only, so displaying google map image to any other thing such as PDF and printing purpose may need special license from Google. For information please read License restrictions at http://code.google.com/apis/maps/terms.html